Pages

Saturday 25 February 2017

Fantastic Frangipani


Feature Interview

Frangipani Society of Australia
So many gardeners love the sight of flowering Frangipani's with their exotic scent, and colourful blooms.
Frangi's as they're known, can have a bewitching effect on the  collector, admirers and avid gardeners.

Sometimes if you weren't a collector but went to a Frangipani Show, you suddenly became one because there are so many colours and cultivars that you just have to have.
Not everyone can grow them though and there are some helpful tips that need to be followed.
I'm talking with Anthony Grassi, Coordinator of the Frangipani Society of Australia's shows.

Why isn't my Frangipani flowering?
Often a question asked and her'es the answer.
Frangipani's need 6 hours of full sunlight to initiate flowering.
However, if you have a tree that was grown from seed, then expect to wait a minimum of 3 years, and sometimes up to 10 years, before it starts to flowers.
Cutting grown frangipani's will flower in the first year, but not in the second because the tree is putting it's energy into establishing a strong root system.
Flowering will recommence in the 3rd year.
Fertilise when the claws first appear in Spring with a 6 months controlled release fertiliser and add granular sulphate of potash.
Sudden Impact for Roses is also a good alternative.

VEGETABLE HEROES

Which Foods Can You Re-Grow?
Have you ever wondered about re-growing food from the bits you cut off from veggies?

Instead of throwing those ends into the compost, or giving them to your chooks or worm farm, while all these things are good, you could be saving yourself some money by popping them into the veggie bed.
Here a just a few of the many that you can re-grow.

Let's start with the greens like lettuce, Bok Choy and cabbage are relatively easy to grow from scraps.
Place any leftover leaves in a bowl with just a bit of water in the bottom.
Keep the bowl somewhere that gets good sunlight and mist the leaves with water a couple of times each week.
After 3 or 4 days, you will notice roots beginning to appear along with new leaves. When this happens you can transplant your lettuce or cabbage in soil.

Celery
: to re-grow celery, cut off the base of your celery and lay it in a bowl with just a bit of warm water in the bottom.
Keep the bowl in direct sunlight as long as possible each day and after about a week, leaves should appear along the base.
When this happens, you can transplant your celery in soil and wait for it to grow to full length.

Lemongrass is a snap to grow.
After trimming the root that put it into a jar with enough water to cover it and leave it in the sunlight. 
After a couple of weeks, new leaves will shoot and you can plant those into your herb garden.

Gardeners the world over have probably tried growing Avocado from the seed just for fun.
All you need to do if you haven't tried this before is to wash the seed and use toothpicks to suspend it over water in a jar.
The water should come up enough to cover the bottom few centimetres of the seed.
Place your jar in a warm place but not in direct sunlight and remember to check the water every day and add more as needed.
It can take up to six weeks for the stem and roots to appear and once the stem reaches about 15 cm you will need to cut it down to 7 cm.
When leaves begin appearing, you can plant the seed in soil, remembering to leave about half of it above ground.
Of course there’s no guarantee that your resulting tree will have the same fruit as that of the seed.
Pot luck I guess.
Who knew that potatoes can be grown from potato peelings?
You need peelings that have eyes on them. 
Cut those peelings with at  least two or three eye, into 5 cm pieces. 
Dry them out overnight,then plant them about 10 cm deep in your veggie bed.
It helps if the eyes are facing up when planting.
In a few weeks your potato plant will begin to grow.

Sweet potatoes can be re-grown as well.

You just have to cut the sweet potato in half and suspend it using toothpicks above a jar or take-away of shallow water.
Roots will begin to appear in just a few days and sprouts will be seen on top of the potato around that same time.
Once those sprouts reach about 10cm or so in length, just twist them off and place them in a container of water.
When the roots from this container reach about 2-3 cm in length, you can plant them in soil.

Ginger or Turmeric root is very easy to grow and once you get started, you can keep your supply of ginger full.
Plant a spare piece of your ginger root in potting soil, making sure that the buds are facing up.
You’ll notice new shoots and new roots in a few weeks.
Let this grow for about a year before harvesting the roots.
Remember to save a piece of the rhizome so that you can replant it and grow more for the next time you need it.

Pineapple is easy.
It’s been mentioned before on Vegetable Heroes but you can grow your own pineapple even if you don’t live in the tropics.
You just cut the top off and insert a few toothpicks to hold it above a jar filled with water or pot it up into Bromeliad mix
If you’re growing it in water, remember to change the water every other day or so and keep the container filled so that it reaches just about the base.
You’ll notice roots in about a week or so and once they are formed you can transplant into potting soil. 
If you live in a cooler area, it is best to grow your pineapple indoors.

Who doesn’t know about re-growing garlic from scraps?

Sometimes the garlic sprouts a green shout while it’s still in the fridge.
Garlic is really easy to grow and can be done from just one clove.
When you buy garlic, you get several cloves so just pull one off and plant it with the roots facing down in potting soil.
Non-organic garlic has been sprayed with chemicals to stop it sprouting, to bleach it and to kill insects and plant matter.
However, if you do manage to see one sprout, Garlic likes plenty of direct sunlight so in warmer weather, in a sunny position during the day.
Once you notice that new shoots have established, cut the shoots back and your plant will produce a bulb.
You can take part of this new bulb and plant again.

Onions and Leeks
:If you want to re-grow onions or leeks, when you've cut the end off  make it at least 1 cm of onion. 
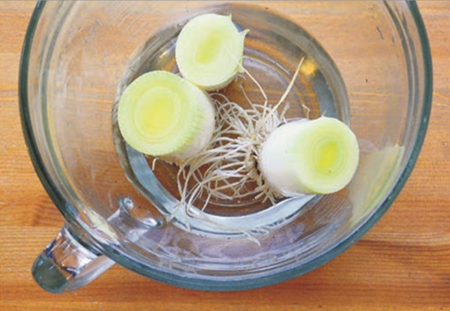
Put this piece in the veggie bed and cover lightly soil and keep in a sunny area. 

Growing from seed is sort of like re-growing scraps because the seeds are coming from the veggies your bought home with you.
If you like your pumpkins, you can save those seeds and plant them.
Just spread the seeds out in a sunny area outdoors and cover with soil. You can also plant an entire pumpkin. 
Of course many gardeners grow a number of hot peppers from the seeds that are leftover. 
Just collect the seeds from your habaneros, jalapenos or any other peppers that you have on hand.
Plant them in potting soil and keep in direct sunlight unless it is warm outside and then you can just plant them in your garden area.
Peppers grow relatively fast and don’t require a lot of care. Once you get a new crop, just save some of the seeds for replanting again.
Just be mindful of the growing season of peppers.
Pepper seeds are best planted in late Spring, or early Summer so they can grow in the warmest months of the year.
If you like tomatoes then become a seed saver and grow your own by saving those seeds of your favourite store bought tomato.
You just have to rinse the seeds and allow them to dry.
Plant in a good, rich potting soil until you notice growth coming in.
Allow the seedlings to get 5 cm high before transplanting them outdoors.
During cold weather you can grow your tomatoes indoors.

Of course many stone fruit and citrus can be grown from their seeds but in Australia, all citrus is grafted onto a hardier root stock so the one you grow yourself from seed won’t be as vigorous and the fruit could suffer as a result.
Mushrooms are good to go!
Unbelievable you can grow mushrooms from cuttings, although they are a bit more difficult than many other vegetables.
You’ll need a warm area with a lot of humidity and soil that is rich in nutrients.
It’s much better to grow your mushrooms in a pot as opposed to in the ground because you have a better shot at controlling the temperature and the humidity.
You just have to cut away the head of the mushroom and plant the stalk or stem in the soil.
Leave the very top exposed and this base will begin to grow a new head.

To regrow bulb fennel requires that you keep the roots intact.

You need about 2 ½ cm of the base of the fennel to get it to regrow.
Just place this base in a jar or bowl with about a cup of water and leave it in direct sunlight.
When the roots grow strong and you notice new green shoots coming up from the centre of the base, you can transplant into soil.

Re-grow, Basil and Coriander from a piece of stem about 5 -10cm high. 

Place this stem in a glass of water with the leaves well above the water line.
Leave the glass sitting in a bright area but not in direct sunlight. Roots should begin to form in a few days and when those roots reach 5cm long, you can transplant them in soil.
Re-grow a turnip for the top that you've just cut off when preparing to cook them.
Put this cut off piece into a jar of water.
You should notice new green tops growing in just a few days after you begin.
Just allow the root to continue growing until it’s ready to be transplanted in the ground. This works with many root vegetables such as beets, turnips and even parsnips.

AND THAT WAS OUR VEGETABLE HERO SEGMENT FOR TODAY!

PLANT OF THE WEEK

Burmese Honeysuckle: Lonicera hildebrandiana

If you like the colour golden yellow and you like perfume in the garden, consider planting one of the world’s most spectacular climbers.


The scent is to die for and it’ll knock your eyes out as well.
Yes, it’s a climber but you can let it scramble over the ground.
Let’s find out about this plant.
I'm talking with the plant panel Karen Smith, editor of Hort Journal www.hortjournal.com.au and Jeremy Critchley, The Green Gallery wholesale nursery owner. www.thegreengallery.com.au


Burmese honeysuckle is a non-invasive version of honeysuckle but be warned it’s a climber on steroids.
Often said by Peter Nixon garden designer, " you might need a whip and a chair to keep this one under control."

What may entice you though is that its berries taste just like Gin and Tonic.

Saturday 18 February 2017

Having a Shearing Time with Flowers

TOOL TIME

Shears and Hedge Shears

Do you use a whipper snipper for just about every edging job in your garden?
Are you happy with the results?


Whether you are pruning a Knot  Garden or just a few shrubs you need to know what works best.
Knot Garden-Hatfield House photo M. Cannon
Whipper snippers aren’t so good for areas where you’ve got lots of low growing plants that have crept over your lawn.
If these plants get whippered snippered back, not only does it look ugly, but sometimes these plants don’t recover that well if ever.
The same with electric trimmers. They tend to tear the branches.
So what’s the alternative?
Hedge shears, Grass shears, Topiary shears. Straight blades or wavy blades.
Which is best to use for you?
Let’s find out about hedge and grass shears. I'm talking with Tony Mattson, General Manager of www.cutabovetools.com.au

The old saying goes "you get what you pay for" so by investing in quality tools, you’re likely to have less fatigue, fewer breakdowns and longer tool life.

When choosing the type of hedge shears you want, think about how much you'll use them, where you'll use them, who will be using them, and, of course, how much you can spend on them.Wavy and straight blades are interchangeable in their use.
The wavy blades hold the stem of what your cutting rather than pushing it out. 
Wavy blades are no harder to sharpen than straight blades, with various sharpening devices to accommodate them.
There's also no difference in weight between wavy and straight blades. 
The weight is mainly in the length of the handles.
Hedge shears should not be used to cut twigs or branches bigger than a ladies fingers.
Grass Shears


Bigger plant material than that, and the blades will be bowed out which is pretty hard to fix.
There’s no need to use your hedge shears to cut your lawn edges; for that your need grass shears or edging shears because these are perfect for lawn edges.

If you have any questions hedge shears, drop us a line to realworldgardener@gmail.com or write in to 2RRR PO Box 644 Gladesville NSW 1675


VEGETABLE HEROES

Edible Flowers

Have you ever thought of eating the flowers of some of your plants but decided you didn’t know if they were safe?

Why would you eat flowers anyway? Did you know that flowers that are edible are featuring in some of Australia’s top restaurants, including those of violas, baby’s breath, fennel, coriander, peas, rocket and Borage?
Some explanation can be found from the history of edible flowers which can be traced back thousands of years.
Romans used edible flowers such as mallows, roses and violets in a lot of their dishes.
You’ve probably heard of and even eaten capers, but did you know capers (Capparis spinosa) are the flower buds of a Mediterranean evergreen shrub and have been used to flavour foods and sauces for over 2,000 years? 

Edible flowers such as daylilies and chrysanthemums have been used by the Chinese and Greeks for centuries.
In a fifteenth century book of recipes is a list of herbs considered necessary for the garden and include borage flowers, daisies, violets to be used in soup, violets for sauce and gilly flowers (that’s clove pinks to you and me) for drinks."

Seems like eating flowers is nothing new

Which Flowers?

Nobody says you should tuck into a plate of flowers, because that would be too much.
If you suffer from hayfever, then give eating flowers a big miss as well.
Never eat flowers bought at a flower shop or nursery as these may have been treated with harmful chemical
Another warning, not all flowers are edible, and some are poisonous if you can’t identify the flower, then don’t eat it.
Then there are some that aren’t poisonous, but don’t taste nice.
Stick to the ones you can identify from the ones that are mentioned in this segment.

Which flowers are safe?

Well, I’ll talk you through a number of flowers some you might know already.
Back to that question of why are restaurants adding flowers to their dishes?..
Is there something that you eat that’s a tad boring that needs an extra bit of zing and colour?
Ever thought of tossing Nasturtium and Calendula petals into a fresh garden salad, or top a parfait with a couple of violets or heartsease?
Everyone’s heard of stuffed zucchini flowers, and maybe Nasturtium flowers as well. They’re easy to identify.

But what do they taste like?
Nasturtium flowers are sweet with a peppery flavour.
Zucchini flowers taste sweet, with a honey nectar flavour.

What about any others?

Calendula or Pot Marigold tastes a bit like Saffron-spicy tangy and peppery.
Flowers of the herb Rocket are much less peppery than the leaves, but the propeller shaped flowers are delicate, so handle these carefully.

Violets and heartsease taste like sweet nectar and suit desert dishes.

Borage is another one that many people might know already-those bright blue flowers on the blue-green stalks with large leaves that are a bit rasp like to touch. Borage flowers tastes a little like mild cucumbers.
Borage flowers
Pea flowers –guess what, they taste like peas.
What should you do when collecting the flowers and how do you use them in your dishes?
First of all, unless the flavour suits the dish, then there’s no point to adding the flower, so good chefs say.
Take note all you budding Masterchefs.
Looking pretty isn’t enough, it has to enhance the food.
You might use pea flowers with other green flavours, and of course the flowers that taste of sweet nectar are used to lift the flavours of sweet dishes.
Those with peppery or spicey flavours go well in salads.
Less peppery than the leaves.
How to pick your flowers.
Pick your flowers just before you’re about to use them if at all possible.
Check them carefully for bugs, but don’t wash them, because the petals are fairly delicate.
Store them in the fridge in a plastic container covered with a damp paper towel while you’re preparing dinner, or lunch.
Just as you’re about to serve the meal, add the flowers as a final touch.
Sweet flowers can be combined with tea or frozen into ice cubes.
Ground dried petals can be mixed into biscuit pastry or pancake batter for something different.
Some flowers in your vegetable garden you don’t want to pick because they’ll grow into veggies that you want.
So just be selective.
There are others that you need to pick even if you’re not going to eat them because the leaves of these plants become bitter, these are greens including spinach, kale, mustard, bok choi, broccoli, and lettuces,radish and for herbs, basil, coriander, thyme, and mint.

Why are edible flowers good for you?
The flowers contain a portion of the same nutrients that the plant they came from has. Simple as that.
Finally, remember if you’re not sure, to check with a reference book, your garden centre or nursery, before eating a flower to make sure it’s safe to eat.

LIVING PLANET

How To Look After Your Worm Farm? Getting Started.

Still not convinced about worm farms?
Well did you know that in one worm, there is around 474, 075 million bacteria ?
These bacteria do an incredibly important job – mainly making minerals available to your plants.
From the reference “Earthworms in Australia’, by David Murphy,
When compared to the parent soil (the original soil), worm castings (the worm’s poo) have approximately:

7 times the available phosphorous: 6 times the available nitrogen
3 times the available magnesium: 2 times the available carbon
1.5 times the available calcium
So which worms go best in worm farms?
Let’s find out. I'm talking with Sophie Goulding, environment project officer with a local council.

Worms like to be kept moist and covered because they're Sensitive to light.
Keep your worm farm in a shady spot so that they don't overheat and on hot days, give them a sprinkle of water.
worms hate light.
The worms don’t create the minerals out of thin air but change their form from insoluble to soluble by digesting them.
That’s reason enough to get into worm farming.

PLANT OF THE WEEK

Crucifix Orchid.
Epidendrum ibaguense

For some people, orchid growing successfully eludes them but there’s a reason why.
Most supermarket chains sell the gorgeous and enticing moth orchid, but they’re not for beginners.
If you’ve failed with a moth orchid, (Phalaenopsis  spp.) you need to go for something tough and easy that you can practically throw onto the ground and it will grow.
Let’s find out about this plant.I'm talking with the plant panel- Karen Smith, editor of Hort Journal www.hortjournal.com.au and Jeremy Critchley, The Green Gallery wholesale nursery owner. www.thegreengallery.com.au

Crucifix orchids are constantly in flower and don’t have any trouble clinging to rock, as their roots work their way into tiny crevices and cracks.
Epidendrum ibaguense

Crucifix orchids have tough, leathery leaves along reed-like stems, which can be up to 1.2m long. The clusters of starry flowers appear at the end of each stem and come in red, orange, yellow, purple, white and salmon.

This is the perfect orchid for beginners as they’re incredibly tough and can be grown in any free-draining mix in pots or the garden, or simply tucked into a rockery.


Saturday 11 February 2017

Getting Gardening Under Control

PLANT DOCTOR

Organic Herbicides vs Inorganic Herbicides

Weed control can be the bane of gardeners’ lives if you have weeds that continually pop up year after year.
Wouldn’t you love to dispatch them quickly without harming the environment, good bugs and wildlife in your garden?

Synthetic herbicides have a greater potential to contaminate surface water so if in the past you’ve succumbed to using systemic herbicides, here’s a good reason why you should put that down and pick up something better.
Let’s find out about what’s new. I'm talking with  Steve Falcioni, General Manager of www.ecoorganicgarden.com.au


The sprays mentioned were those with (a) Acetic acid (vinergar) and salts. (b) Pine Oil based. (c)NEW, "Slasher" based on Nonanoic which is also called Pelargonic acid and occurs naturally as asters in the oil of Pelargoniums.
The advantage of "Slasher" is that it can be used on cloudy days and during winter. Acetic acid sprays rely on sunlight to burn or dessicate the plant you spray it on.
One thing to remember, these are knock down herbicides which doesn’t remain in the soil, so if new weeds come up, you’ll have to spray them again.
Systemic sprays are absorbed into the tissue of the plants like the roots, leaves and stems.
No systemic spray is organic and Glyphosate sprays have been proven to not bye "locked " by the soil and become naturalised. 
Glyphosate should not be sprayed near wanted plants whose root systems might be touching the root system of weed.
If you have any questions Nonanoic acid in weed control, drop us a line to realworldgardener@gmail.com or write in to 2RRR PO Box 644 Gladesville NSW 1675

VEGETABLE HEROES

Fungal Problems on Beans
In the warmest time of the year when the temperature keeps going higher and higher and the humidity is not far behind, some plants in the garden seem to go downhill.
Why?
The reason is the humidity escalates fungal problems in the garden even if you planted them the right distance apart and your chose strong varieties.
Today I’m talking about some problems with the common bean.
We all know our beans, Phaseolus vulgaris which belongs in the Fabaceae family.
We love our beans that either grow on bushes or vine-like climbing plants.
Depending on which variety you have, your bean flowers could be white, pink, lilac or purple and the bean pods can be8 – 20 cm long in any colour from green to yellow to black or purple.
Common beans are warm season crops so unless you’re in sub-tropical areas, you can’t really grow them all year round.

Bean Rust
Bean rust
Let’s start of the bean rust which is used by the fungus Uromyces appendiculatus and first appears as small pale spots (lesions), which become yellow with a small dark centre.
These spots get bigger and produce brick-red rust (summer) spores to spread the disease Infection is favoured by ten hours or more of dew or water remaining on the leaves overnight, with temperatures between 17 - 270 degrees C.

As soon as you see symptoms you need to spray with a fungicide containing copper or sulphur. 

Alternaria Leaf Spot
The next problem is called Alternaria Leaf spot or Alternaria alternata.
This fungal problems likes warm humid weather and starts of as small irregular brown lesions or dead patches on leaves which expand and turn grey-brown or dark brown with concentric zones
Alternaria Leaf Spot
As the older areas of lesions dry out and drop from leaves this causes what looks like a holey leaf or shot hole.
Then these dead patches or lesions join together to make large necrotic patches
Disease emergence favoured by high humidity and warm temperatures but plants grown in nitrogen and potassium deficient soils are more susceptible
The best way to manage this problem is to plant beans in fertile soil and use a foliar fungicide that’s registered for the problem. 

Anthracnose

Another common fungal problem in warm humid zones is Anthracnose or
Glomerella lindemuthiana.
This is a hard one to beat appearing straight away on the first emerging leaves and looks like small, dark brown to black lesions with oval or eye-shaped lesions on stems which turn sunken and brown with purple to red margin.
Stems may break if cankers are bad enough so that they weaken the stem while pods become dry and shrink above areas of visible symptoms.
Anthracnose on Beans
You might also see reddish brown spots on pods which become circular and sunken with rust coloured margin
Where does the disease come from?
Anthracnose can be transmitted through infected seed and the fungus can survive in crop debris in soil and reinfect crop the following season
If you’ve had anthracnose what you need to do next season is plant resistant varieties; use certified disease free seed and avoid sprinkler irrigation.

Instead, water plants at the base plus remove any bean plant material. 

Bacterial Blight
Lastly a look at something called Bacterial Blight or Xanthomonas campestris and can look like anthracnose to the untrained eye.
Bacterial blight looks like water-soaked spots on leaves which grow bigger and turn brown meaning a dead or necrotic spot on the leaf.
The spots may be surrounded by a zone of yellow discoloration.
Again, like anthracnose the spots join together and give the plant a burned appearance.
Leaves that die remain attached to the plant.
Bacterial Blight on Beans
This disease also shows up as circular, sunken, red-brown lesion on pods, which may ooze during humid conditions.
This disease can be introduced by contaminated seed, plus bacteria overwinters in crop debris.
Bacterial blight likes warm temperatures and the spread is greatest during humid, wet weather conditions. 

What can you do if you think you have this problem in your beans?
Plant only certified seed; plant resistant varieties; treat seeds with an appropriate antibiotic prior to planting to kill off bacteria; spray plants with an appropriate protective copper based fungicide as a preventative, before appearance of symptoms.

Rob's Beans  
Lastly, from an email, Rob says his bean plants were growing poorly, meaning they were stunted and not many beans.
When I asked Rob to test the pH of his soil, he was surprised to find that it was pH 5, so very acidic.
Now Rob has to apply garden lime or dolomite to bring the pH back to neutral which is around pH .
Just goes to show that you can manure your garden bed, add lots of compost and still have over time, quite acidic soil.
You can’t beat that pH test.

LIVING PLANET

Worm Farms Series Part 1-All About Worms
Quite a few people are still not sure about whether or not they should invest in a worm far.
Is it too much work, where do you put the worm farm, and will it attract vermin are some of the questions that emerge?
But you can get away from the fact that a worm farm is a fantastic way to minimise food waste by turning your organic kitchen waste into nutrient-rich fertiliser for your plants and soils.
So how do the worms do it?

Let’s find out. I'm talking with Sophie Goulding, environment project officer with a local council.


Worms don't have eyes, but have areas or spots on their skin which sense light.
B because worms dislike light, you need to keep them in a shady spot and covered.
Worms have up to 7 hearts but if you cut a worm in two, the back half will die and possibly the front half as well.
Worms start of as tiny eggs the size of a fertiliser prill.
Out of each egg, 5-7 worms will hatch out.
Keep your worm farm moist but not overly wet. worms don't like to dry out, but if your district experiences heavy rainfall, check the worm farm to make sure that your worms haven't drowned.
We’ll continue the series next week but just to remind you that compost is a soil conditioner but worm-improved compost is a slow release fertiliser and biostimulant as well.

PLANT OF THE WEEK

Peppercorn Tree Schinus molle var. Areira

Large trees provide lovely cool shade in the heat of summer and what’s not to love about a tree with drooping ferny leaves that keeps you cool?
You see these trees on rural properties lining the driveway leading to the home, but should they be grown at all?
Peppercorn Tree
Let’s find out about this plant. I'm talking with the plant panel: Karen Smith, editor of Hort Journal www.hortjournal.com.au and Jeremy Critchley, The Green Gallery wholesale nursery owner. www.thegreengallery.com.au
The Peppercorn tree is evergreen and grows to about 10 metres.
Bear in mind that this tree spreads readily by seed; is invasive in a variety of habitats including grassland, woodland and riparian areas; and is regarded as an environmental weed in most Australian states.
The berries from the peppercorn tree have been dried and ground for use
as pepper, but are not the source of traditional pepper.

Peppercorn tree.


From Grow Me Instead choose an Acacia, or Eucalyptus torquata.


Saturday 4 February 2017

Scarlet Flowers on Trees and Cleaning Naturally

THE GOOD EARTH

Natural Cleaning in the Home

A lot of gardeners like to go organic because it’s good for the environment, safe for beneficial insects and it’s also good for our health because we’re not eating pesticide residue.
But what about inside the house?
We’re still cleaning with toxic chemicals whose manufacturer’s instructions tell us to wear face masks and gloves.
Some of these chemicals are so harsh that their smell is enough to make one feel sick.
Not only that, the whole production process uses derivatives from oil or from mined sources.
Let’s find out about what else you can use to clean your house.
I'm talking with Margaret Mossakowska, President of Permaculture North.

Switching to natural cleaning options is an important part of creating a natural home. Natural cleaning options can save time, money, and reduce chemical exposure.
The best tip is bicarb soda and vinegar to clean most things.
Vinerage is a mild bleach and can be used to clean the kitchen bench top, bathroom surfaces and even the toilet.
To clean your oven just mix a little water with bicarbonate of soda and place on the grease spots.
Wait a few minutes, then spray with vinegar.
This will foam up and lift off the grease.
You can use normal white vinegar.
There’s also citrus infused vinegar.
All you do is fill a jar with (organic) citrus peels and pour undiluted white vinegar over them. Leave for a few days (up to 2 weeks) and strain out the vinegar to use as a natural cleaner. It works as a window cleaner (dilute with water), for mopping floors, or for disinfecting surfaces.
Isn’t that what people used to do in the olden days?
Funny how some things come around to again.
If you have any questions about the right tool for the right job, drop us a line to realworldgardener@gmail.com or write in to 2RRR PO Box 644 Gladesville NSW 1675


VEGETABLE HEROES

Celeriac or Apium graveolens var rapaceum
Ever heard of the ugly duckling of the vegetable world?
I could think of several but Celeriac or Apium graveolens var rapaceum has been described as the ugly duckling of vegetables, or just plain ugly.
But if you don’t think of vegetables as pretty or ugly, don’t be put off by all that talk because it’s pretty useful to have in your garden.
Celeriac is closely related to celery even though itlooks nothing like it.
The early Greeks called celeriac, selinon and it’s mentioned in Homer's Odyssey in 800 B.C.,
That means, Celeriac has been grown as an edible plant for thousands of years.
But it wasn’t until the Middle Ages that celeriac became an important vegetable .
From that time on, it spread from the Mediterranean, finding its way into Northern European cuisine.
Celeriac looks like it might be the root of something, but it actually is the swollen stem.
The usual size you see in the supermarket is roughly 10cm, a very pale brown, rough, almost acne’ed looking ball with lime green tops.
The green tops look a bit like celery, and the smell is similar but a bit stronger.
The thick, rough brownish skin covers a creamy white, crisp inside that’s slightly hotter tasting than celery.
Celeriac also grows more easily and keeps longer than celery, making it an excellent winter vegetable.
You also don’t have to do any of that blanching the stems as they’re growing like you do with celery.
When to grow it?
In sub-tropical areas you can sow the seed in March, April and August.
In arid areas, you’ll have to wait until next Spring and in most other regions of Australia, you can sow the seed in Spring, Summer and Autumn, except for the tropics. It’s not really suited to that region.
But should you be listening somewhere in tropical Qld, and have grown Celeriac, please drop us a line about your success.
Celeriac is best planted at soil temperatures between 8°C and 21°C.
Hot summers won’t suit this plant. Wait until this hot weather takes a break or start the seeds off in punnets.
Tip:Celeriac seeds are a bit hard to germinate, but if you soak the seeds in a saucer of water with a splash of seaweed solution, this will help the germination rate.
Like a lot of members of the Celery family, Celeriac likes soil that has plenty of organic compost and manures, otherwise, it’ll bolt to seed.
If you start your Celeriac seed in punnets, you can control the moisture content of the mix more easily rather than in the garden bed.
Transplant when there’s at least 4 leaves.
Celeriac loves wet soil. You can’t water it too much, and a thick layer of mulch will help in keeping the soil moist.
If you don’t water it enough you might get hollow roots or the plant will bolt to seed.
Keep the weeds down as well because celeriac doesn’t compete well with weeds, but don’t disturb its shallow roots.
As the root develops, snip off side roots and hill the soil over the developing root.
Side dressing periodically during the growing season with an organic fertilizer high in nitrogen, like chook poo, is also helpful, but don't overdo it, otherwise you’ll get lots of leaf, rather than root, growth.
Celeriac, like many "roots", is a long-season, cool-weather crop;
slow-growing, taking around seven months from seed to maturity (that is, about four months from transplanting), although the root is edible at any earlier stage.
As a rule, the longer you leave celeriac in the garden, the larger the root gets; some say they don’t really get woody when large, while others say dig them up when they’re small (10cm diameter) –
And again, some say celeriac is frost-tender, while others say a few light frosts won't bother it.
I’ve heard that "celeriac increases in flavour after the first frost.
You can leave them in the ground over-winter, harvesting as you need them..
One other thing, some recommend drawing soil up around the stems in early autumn, to blanch them; but that’s entirely up to you and I tend not to bother.
When it grows, the swollen Celeriac stem tends to push itself out of the soil, sitting just a few centimetres of soil level.
If it doesn’t do that for you, you might have to give it a helping hand, and scrape away some of the soil towards the end of the growing season.
Apart from the long growing season, pests don’t seem to like Celeriac, so a bonus.
No spraying needed.
What do you do with this vegetable?
Whatever you do with potato you can do with celeriac.
You can also eat it raw. –can grate it or cut it into thin strips or cubes, and to serve it as a salad seasoned with a dressing.
Celeriac can also be cooked, either on its own or together with other vegetables.
It makes a good puree mixed with potatoes, but best of all, it makes a non-starch substitute for tatoes.
Why is it good for you?
Raw celeriac is an excellent source of potassium and a good source of vitamin C, phosphorus, vitamin B6, magnesium and iron.
Cooked celeriac is a good source of potassium and contains vitamin C, phosphorus, vitamin B6, and magnesium.
celeriac is said to be diuretic, demineralising, and a tonic, and stimulates the appetite and cleanses the system
AND THAT WAS OUR VEGETABLE HERO SEGMENT FOR TODAY

PLANT OF THE WEEK

Illawarra Flame Tree Brachychiton acerifolius
Do you need a fast growing tree or large shrub but not a Grevillea and it needs to be a native so it’ll attract local native birds?
If you do, then you can’t go past this one then because it’s a robust native tree, it’s only partially deciduous and has spectacular red flowers from early summer through to autumn.

rachychiton acerifolius photo M Cannon
Let’s find out about this plant.
I'm talking with the plant panel were Karen Smith, editor of Hort Journal www.hortjournal.com.au  and Jeremy Critchley, The Green Gallery wholesale nursery owner. www.thegreengallery.com.au


This tree grows to around 10 metres plus in the home garden.
In a "good year" the Illawarra flame tree is arguably the most spectacular of all Australia's native trees.
Flowering  is usually in late spring  where the tree drops its leaves first.
This tree has large seed pods which if you’re a keen propagator, you can easily germinate the seeds.
Bear in mind though that flowering may take around 5-8 years from seed.
This tree is a food plant for the larval stages of the Pencilled Blue, Helenita Blue, Common Aeroplane and Tailed Emperor Butterflies.